This cake was a labour of love, for the biggest cake lover I know: my mum.
After spending many hours drooling over incredible cakes on instagram (Katherine Sabbath’s and Andy Bowdy’s creations are jaw dropping), I set out to design my own. It wasn’t easy, there is a lot to consider with my family, a lot of likes and dislikes… and I didn’t just want something that looked beautiful, it had to taste incredible too. So I started with a pen and paper and drew my design, throwing flavours and styles around. The end result? Well, it was pretty spectacular and tasted pretty awesome if I do say so myself! I cannot wait to make another cake like this.


EPIC CARROT, HONEY, SPICED LAYER CAKE
There are a lot of components to this cake. It really is time dependent so give yourself a few days. I would recommend starting it the morning of the day before you want to present it. Alternatively you can do some stages in advance to help with the prep. I made the sponges and froze them immediately, a couple of weeks before I finished the cake. I then made the mousse and brittle the night before, which took a lot of the pressure off.
Also you’ll need to have enough freezer space for 2 cake tins.
Serves… a lot! At least 20 – 24
CARROT AND CARDAMOM CAKE
- 300ml sunflower or light olive oil, plus extra for greasing
- 450g self raising flour
- 2 teaspoons baking powder
- 3 teaspoons ground cinnamon
- 15 cardamom pods, pods discarded and seeds crushed
- 450g light brown sugar
- An orange
- 500g carrots, washed and coarsely grated
- 5 large eggs, free range or organic
Preheat your oven to 180/ gas mark 4.
Grease 2 x springform 8″/20cm round cake tins and line the base with greaseproof paper.
In a large bowl sieve the flour, baking powder, cinnamon and crushed cardamom. Finely grate in the orange zest and stir through with the grated carrot. In a separate bowl whisk together the egg, oil and sugar until mixed well. Pour into the flour and carrot mix and stir everything together with a large metal spoon. Divide the cake mix between the 2 greased and lined cake tins and pop into the middle of the oven for around 50 minutes until golden and cooked through (test with a skewer to make sure it is cooked).
Leave the cakes to cool in their tins for 5 minutes and then transfer on to a cooling rack. As soon as the cakes are completely cool place them on a wooden board and using a serrated knife slice the peaked tops off of each sponge, so it is even (keep the off cuts for decorating!). Then slice each cake into two horizontally (I use a ruler to make sure they are as even as possible). You should now have 4 carrot sponges.
Wrap two of the sponges in a few layers of cling film (separately), place the cake off-cuts in a sandwich bad and pop them all in the freezer. Clean the two used cake tins and line each of them with two long sheets of cling film. I lay one across, making sure there is plenty of over hang, and then lay the 2nd piece on top at 90 degrees, to make a cross shape. Pop one of the sponges into the base of each lined tin and place both tins in the freezer.
You can do up to this stage a few weeks in advance, to take the pressure off.
HONEY MOUSSE LAYERS
There are 2 honey layers in the cake. It is easier to make the honey mousse layers separately, as making it all in one go takes too long and isn’t that doable in a conventional kitchen.
- 10 large egg yolks, free range or organic eggs
- 400g runny honey
- 10 sheets of gelatine
- 600ml double cream
Place 5 of the egg yolks in a free standing mixer and whisk on a high speed for around 6- 7 minutes, until pale and thick.
Meanwhile place 200g honey in a small saucepan with 75ml water and carefully bring to the boil. Keep the syrup on a rolling boil for around 8 – 10 minutes until it reaches 115c on a sugar thermometer. Meanwhile soak 5 sheets of gelatine in a bowl of water.
With the mixer on a medium-high speed, slowly pour most of the honey syrup on to the egg yolks, reserving a couple of spoonfuls in the pan. Squeeze the excess water out of the gelatine sheets and stir into the reserved honey syrup until melted. Pour into the mixer also and whisk continuously for 8 – 10 minutes until the mousse has cooled down completely.
Whilst the mixer is on whisk 300ml of the double cream in a clean bowl, until you have soft peaks. When the mousse if cool, gently fold through the double cream with a large metal spoon until mixed thoroughly. Remove one of the cake tins from the freezer and pour the honey mousse over the frozen cake layer. Pop back in the freezer.
For the 2nd honey layer, repeat with the remaining ingredients, and pour onto the 2nd frozen cake tin.
CHAI MOUSSE
- 3 large egg yolks, free range or organic eggs
- 125g honey
- 3 sheets of gelatine
- 180ml double cream
- Around 1 heaped teaspoon of masala chai mix
Start the chai layer when the first frozen honey mousse layer has set. Remove it from the freezer along with the two loose frozen cake layers and leave to one side.
Make the chai mousse the same way as you make the honey mousse, this time using 45ml of water with the honey. Additionally all you need to do is add the masala chai spice mix to the honey before you bring it to the boil. I’ve said 1 heaped teaspoon, but it really depends on the intensity of your spice mix. Homemade can be quite punchy, where as the pre-brought spice mixes tend to be a little more mild. You can ‘season to taste’ or tweak as needed, adding more masala mix later on if it isn’t strong enough.
As soon as the chai mousse is ready, peel the cling film off of the 2 frozen sponges and place one on top of the frozen honey mousse. Nestle it in, and then pour over the chai mousse layer. Pop the tin in the freezer for 30 – 45 minutes until set and top with the remaining carrot sponge. In this tin it should be sponge-honey mousse-sponge-chai mousse-sponge. Return back to the freezer and freeze overnight.
ASSEMBLY AND DECORATING
Only frost the cake once all the layers are completely set (I did this the day after I made the mousse layers). Remove the two cake tins from the freezer and leave to one side.
Make the Italian meringue buttercream as directed here: Italian meringue buttercream recipe
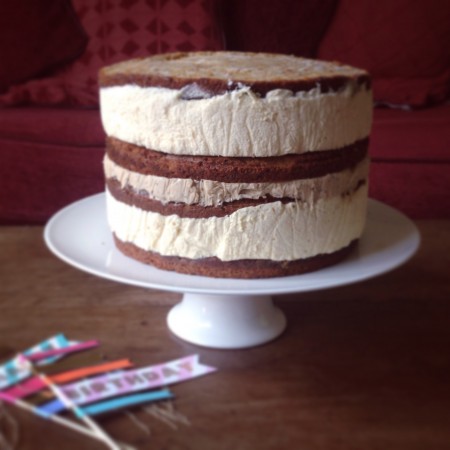
TO ASSEMBLE: Spoon on a dollop of buttercream into the middle of your chosen board or cake stand and spread out a little. Remove the frozen cakes from the tins, and peel off the cling film. Carefully place the larger of the two cakes, the one with honey and chai layers, on the cake stand. You want the honey layer to be on the bottom, chai mousse on top. Spoon a dollop of buttercream on top of the cake and spread out a little. Then stick the remaining cake on top, mousse layer down. (See picture above as a guide).
Use the remaining buttercream to frost the cake. You could crumb coat it, but as the cake is chilled it should be pretty easy to decorate. Place the frosted cake in the fridge.
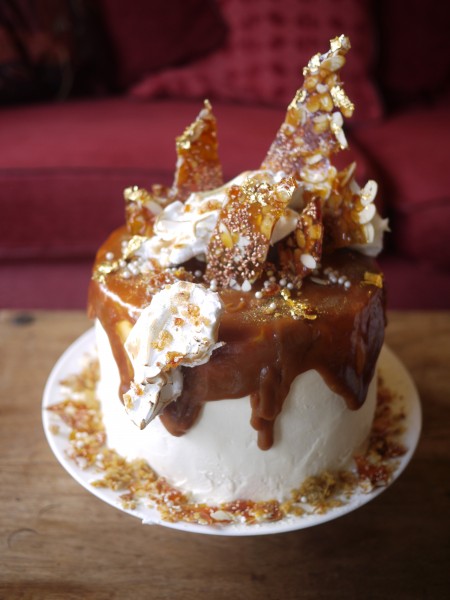
TO DECORATE: I made a sea salt caramel, which I left to cool and then poured over the top of the cake (make sure it isn’t warm otherwise you’ll melt the buttercream). Alternatively you can buy it ready made and spoon it over the top. You want it pretty thick though, so it doesn’t just run down the sides!
To finish, I used the carrot cake off-cuts that I bagged up in the freezer, and piled them up on top of the cake to give it height. On top of these I draped torched meringue (more on that later…). Any leftover bits were crushed into crumbs and sprinkled around the base. I also made an almond brittle which I broke into large shards and stuck into the top of the cake. Again, leftover brittle was crushed in a pestle and mortar and sprinkled on top and around the cake.
And if all that wasn’t enough? There were white edible pearls, gold leaf and of course edible glitter.
NB: Torched meringue is simply a ‘cooked’ meringue – so Italian or Swiss – that is then blow torched to caramelise. I made Italian meringue and spooned dollops and strips of it onto lightly greased greaseproof paper (the more rustic the better). I then used a blow torch to brown it all over, and then left it to cool for a few minutes. ‘Peel’ the meringue off of the paper – using a palette knife is best, and then drape it wherever it is that you need it to go. Et voila!

Oh good Lord that looks amazing.
Thanks! Going to try another one but with a peanut butter, chocolate, pretzel vibe.
Georgina! I am blown away by how talented you are! This one is going to be one I will have to work on, before it looks anything like that, its the taste that counts yeah….? Well done!
Thank you! Thats really kind. And absolutely, taste is key!