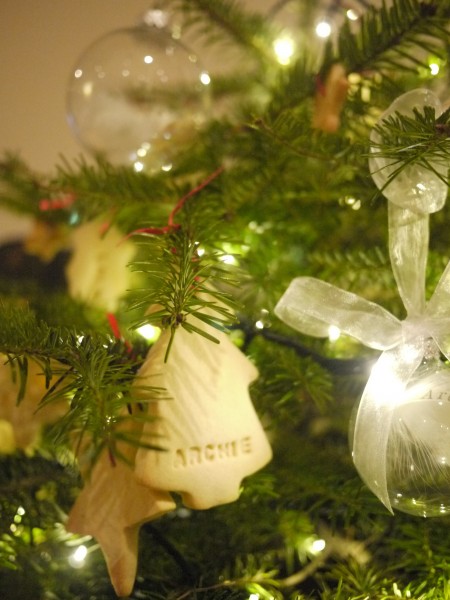
Georgina Hayden

Feeding since 1982

  • Recipes
    • Breakfast & brunch
    • Starters & sides
    • Light meals
    • Main meals
    • Snacks
    • Baking & puddings
    • Drinks
    • Preserving
    • Travel
    • Reviews
  • Books
    • Greekish
    • Nistisima
    • Taverna
    • Stirring Slowly
  • Styling
  • About
  • Contact
  • Press

Healthy cinnamon, fig and coconut granola

12.01.2014 by georgie // 9 Comments

Bar a vat of coffee, I was never much of a breakfast person until I started dating Pete. (Pete is one of those naturally skinny people who has to eat every few hours or becomes mute and/ or grumpy). Now however it is my favourite meal of the day. For the last few months we have started the day with a bowl of chopped seasonal fruit and yoghurt, which has been perfect but now that the days are getting colder we’re finding we need something a little more filling. Porridge has made a welcome wintery return, however you can only have porridge for so many days on the trot without feeling like you are living off wallpaper paste. And cereal is pretty much a no-no in the Hayden household now (Sugar! Sugar!), and although some are ok, a lot of my dear boys favourites have been kicked to the curb. What to do?

Cue: homemade granola. With Pete’s nut allergy it wasn’t easy finding a granola or muesli that was nut free and wasn’t full of sugar. And when I did find one that was ok, it was crazy expensive! Much cheaper and more satisfying to make your own I say. So today I set about creating a delicious and healthy nut-free granola, to pimp up our fruit and yoghurt breakfast. It is incredibly quick to make, you know exactly what goes into it and, without blowing my own trumpet, it is pretty bloomin’ good.

Cinnamon, coconut and fig granola
Healthy cinnamon, coconut and fig granola


HEALTHY CINNAMON, FIG AND COCONUT GRANOLA

Makes around 16 servings

  • 2 tablespoons groundnut oil (or any flavourless oil – light olive oil, sunflower, veg etc)
  • 125ml runny honey
  • 1 teaspoon ground cinnamon
  • 1/2 teaspoon ground ginger
  • 1/2 teaspoon sea salt
  • 275g rolled oats
  • 125g mixed seeds (I use a mixture of sunflower, pumpkin, sesame and poppy seeds. Around 100g of the larger seeds and then a few spoonfuls of the little ones)
  • 50g unsweetened coconut flakes
  • 100g dried figs, chopped
  • 75g dried cranberries

Preheat your oven to 150/ gas mark 2.

In a large bowl whisk together the oil and honey.

Crush the sea salt with your fingers into the bowl and add the oats, seeds, ground ginger and cinnamon. Mix everything together well with a large spoon and divide the mixture between two baking trays. Spread it out as much as possible and then pop into the oven for 20 minutes. Remove the trays from the oven a couple of times during cooking and mix everything up so it goldens nice and evenly.

After 20 minutes the granola should look pretty golden. Stir in the coconut, chopped figs and cranberries and pop the trays back into the oven for a further 6 – 8 minutes, until the coconut has toasted and you have a lovely crisp granola.

Leave to cool in the tray completely and then spoon into an airtight jar or container. It will last up to a month. Serve with milk and/ or yoghurt, with fresh fruit. Dreamy.

Baked granola
Baked granola
Ready to go
Ready to go

Categories // Baking & puddings, Breakfast & brunch, Vegan and Vegetarian Tags // Baking, Breakfast, Cinnamon, Fertility, Figs, Nut-free, Nutrition, Pregnancy, Pumpkin seeds, Vegan, Vegetarian, Wheat-free

My favourite chocolate cake

11.30.2014 by georgie // 3 Comments

This week I had the privilege of making a special birthday cake for the lovely Jools Oliver. Working for Jamie means I have known Jools for quite a few years now; she is such a lovely lady, incredibly down to earth and a wonderful inspiring mother. She has been very supportive since we lost Archie, her kind and heartfelt words have meant a lot. So when I bumped into Jamie a few weeks ago I mentioned I would love to make her a cake, as a gift for her 40th birthday and a way of saying thank you for her support. When I asked her favourite flavour, I was told ‘chocolate and coffee’. Dream combo. So I took that and went from there…

Needless to say there were a lot of chocolate and coffee components! Including salted pretzel coffee bean caramel, shards of marbled chocolate with chocolate honeycomb pieces and torched homemade marshmallow to finish.

I’ve never made a cake I haven’t delivered myself, so when I let this creation go I was so nervous. I knew it wasn’t being given to Jools until the following day and I just prayed it would make it and stay in one piece! I’m glad to report it did, minus a bit of broken chocolate shard, but I can deal with that. It was a potential mudslide of a cake I was worried about!

So for this blog post I am sharing the base of this creation, the recipe for my favourite foolproof chocolate cake. I use this recipe for all sorts, I even used it as part of our wedding cake. It keeps really well and freezes perfectly too.

Jools' birthday cake
Jools’ birthday cake
Chocolate coffee layer cake


MY FAVOURITE CHOCOLATE CAKE

Serves 16

  • 275g unsalted butter, cut into cubes
  • 150g good quality dark chocolate (70% cocoa solids)
  • 300g golden caster sugar
  • 6 large eggs, free range or organic
  • 150g self raising flour
  • 30g good quality cocoa powder
  • 1/2 teaspoon fine sea salt
  • A shot of espresso or tablespoon of vanilla extract (optional)

Preheat your oven to 180/ gas mark 4. Grease a 23cm spring form cake tin and line the base with greaseproof paper.

Bash up the chocolate into small pieces and place in a heatproof bowl with the butter and sugar. Pop the bowl over a pan of simmering water, making sure that the bottom of the bowl isn’t touching the water. Give it a little stir from time to time, until it is all melted, glossy and smooth. Remove the bowl, and leave it to one side for 10 minutes to cool slightly.

Whisk the eggs in jug, and once the 10 minutes is up gradually whisk the eggs into the chocolate mixture. Do this bit by bit, and whisk vigorously between each addition. Once the eggs are all incorporated sift in the self raising flour, cocoa and sea salt, then fold them in with a large metal spoon until just mixed together. Stir in the espresso or vanilla, if using, and then pour the cake mix into your prepared tin.

Bake in the middle of your oven for around 50 minutes, or until just cooked through. A skewer should come out clean, but still look like the cake is moist. Leave the cake to cool in the tin for 10 – 15 minutes and then transfer to a wire cooling rack to cool completely. I then slice my cake into 3 even rounds, and finish however my heart desires! Sea salt caramel and cream, black forest gateau, with boozy cointreau and orange frosting… the possibilities are endless.


Categories // Baking & puddings, Cake decorating, Celebration, Starters & sides Tags // Baking, Birthday, Cake, Chocolate, Coffee, Sweets

Dal Makhani

11.24.2014 by georgie // 20 Comments

India is my total happy place. If I could jump on a plane right now and go anywhere, it would be India – it is beautiful, colourful, fascinating and most of all delicious. (Also with Christmas looming I could really do with not being in this country for a bit). It is the only country in the world I have spent a significant amount of time in and not got bored of the cuisine. Curry for breakfast, lunch AND dinner? Yes. Please.

Rewind a few years and I was lucky enough to go to the opening week of a trendy new London eatery – Dishoom.  A dear friend of mine is the brains behind the incredible menu, and invited us along. It blew us away. I can’t even begin to tell you how many times we have been back since, but if there were a loyalty card system I would be platinum by now. There are so many delicious treats on the menu it is unreal. I try and mix it up every time we go but there is one constant and that is the black dal. Black dal and if I am feeling really naught a side of cheesy naan. Washed down with chai, lots of chai.

I’ve cooked various versions of this recipe, however today I have finally settled on a worthy Dishoom substitute. I know the Dishoom dal is cooked for a whole day, so in comparison my 6 hour version is a quick cook meal! And it is totally delicious. This is what I would consider real healing food –  in the cooking sense and the meal itself. It is wholesome, warming and meditative. For long lazy days at home and bowls of deliciousness.

Dal Makhani
Dal Makhani


DAL MAKHANI

Serves 8 – 10 (you can easily halve this recipe but for the time and effort it is definitely worth making a larger batch and then freezing any extra dal for a rainy day)

  • 500g urad dal
  • 50g butter
  • 2 large onions, peeled and finely chopped
  • 12 cloves of garlic, peeled and finely chopped
  • A large thumb size piece of ginger, peeled and finely chopped
  • 1 heaped teaspoon mild chilli powder
  • 1 teaspoon ground cumin
  • A heaped tablespoon of tomato puree
  • A tin of good quality plum tomatoes
  • Sea salt and freshly ground black pepper
  • 500ml organic whole milk
  • Double cream or Greek yoghurt, to serve (optional)

Soak the urad dal in plenty of water the night before you want to cook it.

The next day place the soaked dal in a large saucepan and cover with plenty of fresh water. Bring to the boil and then simmer for 40 minutes until the dal is soft (scooping off any scum that comes to the surface). While the dal is cooking saute the veg. Melt the butter in a large non stick saucepan over a medium-low heat. Add the onion, garlic and ginger and soften for 10 – 15 minutes so it is cooked down and soft but not coloured: you want gorgeous sticky onions. Add the cumin and chilli powder to the pan and cook for a couple more minutes before adding the tomato puree. Cook for a few more minutes and then add the tinned tomatoes. Gently crush the tomatoes, breaking them down and bring to a simmer. Cook for 3 – 4 minutes and season generously.

When the dal is cooked, drain and add to the pan with the veg. Pour in the milk and top with enough water to just cover the dal. Bring the mixture to the boil, giving everything a good stir and then reduce the heat to low, so it is gently simmering away. This is where you need time. You could cook this for 1 – 2 hours and it would be ok. But don’t settle for that, you want crazy delicious dal and for that you need to cook it for at least 4 hours. 5 if you can. 6 would be amazing. You could keep going…

Leave the dal ticking away uncovered, giving it a stir every now and then. If it looks like it is getting too dry top it up with a bit more milk, or a bit more water, alternating the two. After a few hours you’ll notice it start to darken, this is great, let it get darker and thicker (try not to drown it in too much liquid) and keep stirring.

Check the seasoning, it is a vast amount of dal so don’t be surprised if it needs more salt and pepper. And serve with poppadoms, rice, naan, chutney, a swirl of cream or yoghurt, or however you fancy. I just like it straight up, it is that good.

Categories // Light meals, Main meals, Vegan and Vegetarian Tags // Fertility, Gluten-free, Indian, Lentils, Mains, Nutrition, Pregnancy, Snack, Vegetarian, Wheat-free

  • « Previous Page
  • 1
  • …
  • 15
  • 16
  • 17
  • 18
  • 19
  • …
  • 26
  • Next Page »
Meet


Georgina is an award winning food writer, cook and presenter from North London.
Read more about Georgina

Recent Posts

  • Book Publication Week – Greekish is here!
  • Introducing “Family Feeds”: A Tasty New Podcast about Food and Family
  • Be More Yiayia T-Shirts are here!
  • Nistisima (And Hello!)
  • My love affair with Delicious

Copyright © 2026 · Modern Studio Pro Theme on Genesis Framework · WordPress · Log in