Georgina Hayden

Feeding since 1982

  • Recipes
    • Breakfast & brunch
    • Starters & sides
    • Light meals
    • Main meals
    • Snacks
    • Baking & puddings
    • Drinks
    • Preserving
    • Travel
    • Reviews
  • Books
    • Greekish
    • Nistisima
    • Taverna
    • Stirring Slowly
  • Styling
  • About
  • Contact
  • Press

My ‘go to’ South Indian dal recipe

01.05.2015 by georgie // 10 Comments

When I published my dal makhani recipe a month or so ago a friend said she loved the sound of it but didn’t have the time to make it (it does take several hours), and do I have any other dal recipes that are quicker? Well, I love nothing more than a request, and of course! I’m just ashamed it’s taken me so long to upload to be honest (I blame the madness of Christmas and New Year).

So, my ‘go to’ South Indian dal. It isn’t strictly authentic, but it is based on several trips to South Indian and eating lots of dal laden with mustard seeds, curry leaves and coconut. This is a real store cupboard comfort food recipe for me; I always have yellow split peas in the cupboard, (it covers so many cuisines – Greek Fava, Swedish soup, Pease pudding, Indian dal…), low fat coconut milk is a key dry store staple for me and my biggest tip? Buy a big bag of curry leaves when you find them and pop them in the freezer. They freeze well and it means they’re always on hand. (You’ll find them in any Indian supermarket or sometimes online. You can use dry if you have them but they’re not as punchy and don’t fry as well).

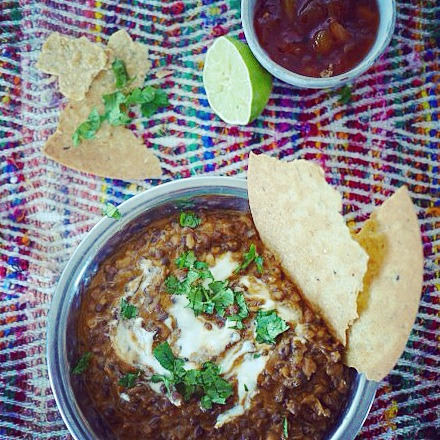
It might not look like much but this dal is incredibly comforting and really is delicious. It is wholesome, filling and packed with iron and it freezes wonderfully, so perfect for a rainy day. Sarah, I hope you like it!

South Indian dal
South Indian dal


MY ‘GO TO’ SOUTH INDIAN DAL

Serves 4 – 6 (serve it as is for a filling and hearty soup or with basmati rice as a meal)

  • 300g yellow split peas, soaked for 20-30 minutes before cooking
  • Groundnut oil or coconut oil
  • 2 onions, peeled and finely chopped
  • 4 cloves of garlic, finely sliced
  • a thumb sized piece of ginger, peeled and finely chopped
  • 1 teaspoon turmeric
  • 1 heaped teaspoon ground cumin
  • 1 heaped teaspoon heaped ground coriander
  • 1/2 teaspoon ground cinnamon
  • 1 tin of low fat coconut milk
  • 20 curry leaves
  • 1 teaspoon black mustard seeds
  • 1 green chilli, deseeded and finely sliced
  • Half a lemon
  • Sea salt and freshly ground black pepper

Pour a lug of groundnut or coconut oil into a large non-stick saucepan and place on a medium low heat. Add the onion, ginger, most of the garlic and saute the veg for 10 minutes until softened but not coloured. Add the turmeric, cumin, coriander and cinnamon and fry for a further 2- 3 minutes.

Drain the yellow split peas, rinse and add to the pan along with the can of coconut milk. Add 600ml of water to the pan, or more, ensure that the split peas are completely covered. Gently bring to the boil and then lower to a simmer and cover the pan. Cook over a low heat for around 1 hour and 15 – 20 mins, so that the split peas have completely cooked through and have turned to mush. Check the dal every so often during cooking, and top up the water if it feels like it is getting too thick. You’ll probably need to add a splash here and then. Squeeze in the lemon juice, season to taste and leave to one side.

EDIT/ NB: Someone just asked me on Instagram if I pureed my dal, as it looks so smooth, which I didn’t. But having said that I did use yellow split peas I bought in Greece which become very creamy. If your peas haven’t completely broken down then do try pureeing them with a hand/ stick blender for a smooth finish.

Add a few tablespoons of groundnut or coconut oil to a small frying pan and place on a medium heat. After a minute or so add the mustard seeds and fry for around 30 secs – 1 minute until the seeds start to pop. Once they do add the garlic, curry leaves and chilli and fry everything for a few minutes, until the garlic and chilli are golden and the leaves look translucent.

Check your dal, as it will probably have thickened a little as it cools, so add a splash of boiling water if it feels too thick. Serve the dal in bowls, and drizzle a little of the temper over the dal- the flavoured oil and leaves, chilli and mustard seeds.

TIPS:

  • l love this recipe with spinach added at the end of cooking. Stir in a handful of frozen spinach balls for the last 5 – 10 minutes of cooking, or a large bag of baby spinach chopped up for the last few minutes. Great for an added iron boost.
  • I didn’t have any fresh green chillies to add to my temper for the picture above, so I ended up just giving it a drizzle of chilli oil before eating, which is totally acceptable too!

Categories // Light meals, Main meals, Vegan and Vegetarian Tags // Dairy-free, Dal, Gluten-free, India, Mains, Nutrition, Pregnancy, Soup, Starter, Vegan, Vegetarian, Wheat-free

Dal Makhani

11.24.2014 by georgie // 20 Comments

India is my total happy place. If I could jump on a plane right now and go anywhere, it would be India – it is beautiful, colourful, fascinating and most of all delicious. (Also with Christmas looming I could really do with not being in this country for a bit). It is the only country in the world I have spent a significant amount of time in and not got bored of the cuisine. Curry for breakfast, lunch AND dinner? Yes. Please.

Rewind a few years and I was lucky enough to go to the opening week of a trendy new London eatery – Dishoom.  A dear friend of mine is the brains behind the incredible menu, and invited us along. It blew us away. I can’t even begin to tell you how many times we have been back since, but if there were a loyalty card system I would be platinum by now. There are so many delicious treats on the menu it is unreal. I try and mix it up every time we go but there is one constant and that is the black dal. Black dal and if I am feeling really naught a side of cheesy naan. Washed down with chai, lots of chai.

I’ve cooked various versions of this recipe, however today I have finally settled on a worthy Dishoom substitute. I know the Dishoom dal is cooked for a whole day, so in comparison my 6 hour version is a quick cook meal! And it is totally delicious. This is what I would consider real healing food –  in the cooking sense and the meal itself. It is wholesome, warming and meditative. For long lazy days at home and bowls of deliciousness.

Dal Makhani
Dal Makhani


DAL MAKHANI

Serves 8 – 10 (you can easily halve this recipe but for the time and effort it is definitely worth making a larger batch and then freezing any extra dal for a rainy day)

  • 500g urad dal
  • 50g butter
  • 2 large onions, peeled and finely chopped
  • 12 cloves of garlic, peeled and finely chopped
  • A large thumb size piece of ginger, peeled and finely chopped
  • 1 heaped teaspoon mild chilli powder
  • 1 teaspoon ground cumin
  • A heaped tablespoon of tomato puree
  • A tin of good quality plum tomatoes
  • Sea salt and freshly ground black pepper
  • 500ml organic whole milk
  • Double cream or Greek yoghurt, to serve (optional)

Soak the urad dal in plenty of water the night before you want to cook it.

The next day place the soaked dal in a large saucepan and cover with plenty of fresh water. Bring to the boil and then simmer for 40 minutes until the dal is soft (scooping off any scum that comes to the surface). While the dal is cooking saute the veg. Melt the butter in a large non stick saucepan over a medium-low heat. Add the onion, garlic and ginger and soften for 10 – 15 minutes so it is cooked down and soft but not coloured: you want gorgeous sticky onions. Add the cumin and chilli powder to the pan and cook for a couple more minutes before adding the tomato puree. Cook for a few more minutes and then add the tinned tomatoes. Gently crush the tomatoes, breaking them down and bring to a simmer. Cook for 3 – 4 minutes and season generously.

When the dal is cooked, drain and add to the pan with the veg. Pour in the milk and top with enough water to just cover the dal. Bring the mixture to the boil, giving everything a good stir and then reduce the heat to low, so it is gently simmering away. This is where you need time. You could cook this for 1 – 2 hours and it would be ok. But don’t settle for that, you want crazy delicious dal and for that you need to cook it for at least 4 hours. 5 if you can. 6 would be amazing. You could keep going…

Leave the dal ticking away uncovered, giving it a stir every now and then. If it looks like it is getting too dry top it up with a bit more milk, or a bit more water, alternating the two. After a few hours you’ll notice it start to darken, this is great, let it get darker and thicker (try not to drown it in too much liquid) and keep stirring.

Check the seasoning, it is a vast amount of dal so don’t be surprised if it needs more salt and pepper. And serve with poppadoms, rice, naan, chutney, a swirl of cream or yoghurt, or however you fancy. I just like it straight up, it is that good.

Categories // Light meals, Main meals, Vegan and Vegetarian Tags // Fertility, Gluten-free, Indian, Lentils, Mains, Nutrition, Pregnancy, Snack, Vegetarian, Wheat-free

Chicken Caesar on rye

11.07.2014 by georgie // 1 Comment

I love leftovers, they make my life so much easier at the moment. I am still at home a lot of the time, and as much as I am trying to look after myself and cook nice things I can’t always muster up the energy. Some days I can’t get out of bed or off the sofa. Not often, but it happens. Thats when the soup comes out, or something from the freezer that my Yiayia has made. Or, if I am really lucky, there are leftovers.

So last Sunday Pete and I treated ourselves to a homemade roast. Lemony thyme roast chicken, roast potatoes, honey glazed carrots, kale, cauliflower cheese, homemade cider gravy… the lot. Afterwards I took a lot of pride in packing up the leftovers and making stock with the chicken carcass. Normally I’d just turn the meat into a salad or broth the next day, but I’d also made a loaf of rye bread on the weekend and wanted to use that too: cue the chicken Caesar open sandwich. I had forgotten how much I loved chicken sandwiches! With shredded organic roast chicken, a delicious creamy dressing, some sort of crunchy element, what is not too like? I’d forgot the beauty of chicken Caesar too, a result of many bad pub meals with fake dressing I am sure…

So here you go, a perfect leftover lunch for one. Not too naughty and tonnes of flavour.

Open chicken caesar on rye


CHICKEN CAESAR ON RYE

This dressing could definitely take a fine grating of garlic, if thats your cup of tea.

Serves 1

  • A thick slice of rye, sourdough or gluten free bread
  • 80g shredded cooked chicken, preferably free range or organic
  • An anchovy
  • Sea salt and freshly ground black pepper
  • 1/2 teaspoon English mustard
  • Parmesan
  • A heaped tablespoon of Greek yoghurt
  • Half a lemon
  • Extra virgin olive oil
  • A spring onion, finely sliced
  • A few sprigs of parsley, finely chopped
  • 1/4 cucumber

Using a vegetable peeler, shred the cucumber into ribbons. Place in a bowl with a squeeze of lemon juice (keeping some for the chicken) and a pinch of salt and pepper. Toss together and leave to one side.

If your bread is fresh simply lay on a plate and drizzle with the extra virgin olive oil. If it is a few days old, toast it first – you could even rub the toast with the cut side of a clove of garlic for a little added flavour.

Place the anchovy in a pestle and mortar and bash to a paste with a little pinch of salt and pepper (not too much salt though as the anchovy and parmesan are already very salty). Add the mustard and yoghurt and mix together well. Then squeeze in the rest of the lemon juice and finely grate in a little parmesan (just a few gratings, you won’t need lots) and stir. Spoon the dressing over the chicken, mix it all together and then pile on top of you bread or toast. Finish with the sliced spring onion and parsley, and serve.

P1180235

Categories // Light meals, Main meals Tags // Chicken, Fertility, Gluten, Gluten-free, Mains, Pregnancy, Snack, Wheat-free

  • « Previous Page
  • 1
  • 2
  • 3
  • 4
  • 5
  • 6
  • Next Page »
Meet


Georgina is an award winning food writer, cook and presenter from North London.
Read more about Georgina

Recent Posts

  • Book Publication Week – Greekish is here!
  • Introducing “Family Feeds”: A Tasty New Podcast about Food and Family
  • Be More Yiayia T-Shirts are here!
  • Nistisima (And Hello!)
  • My love affair with Delicious

Copyright © 2025 · Modern Studio Pro Theme on Genesis Framework · WordPress · Log in